How to Install a 4 Bow Bimini Top
29th May 2019 | Posted by Savvy BoaterA Step-by-step guide to how to install a 4 bow bimini top
How to Install a 4 Bow Bimini Top
Step 1
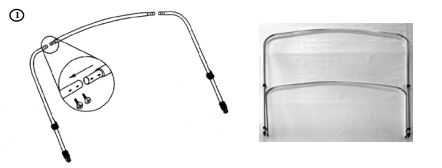
Identify the hook shaped, long, medium, and short metal side bow sections. Using the long side bow sections, and one of the center cross bow sections, assemble the side bow and center bow parts as shown, aligning the pre-drilled holes. Use the 1/2”, no. 8 screws to connect the bow parts securely
Step 2
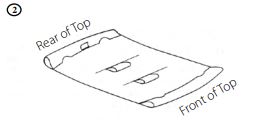
Spread the Bimini Top canvas out on a flat, clean area with the bottom side up. Sewn-in label indicates the bottom, or inside, and the back of the top.
Step 3
With the bows assembled, insert the medium bow assembly through the sleeve at the front of top. (This is the sleeve opposite the end with the sewn-in tag.) Note the position of the single pre-drilled holes on the bow frame. (Holes should 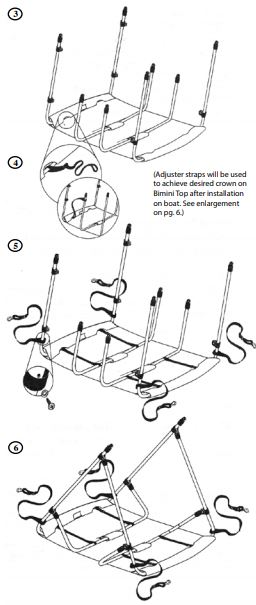 be facing toward the middle of the canvas.) Insert the short bow assemblies through the small sleeves in the center of the top and the long bow assembly through the sleeve at the back of the top (nearest the sewn-in tag). Again, note the position of the single pre-drilled holes on the long bow frame. (Holes should be facing toward the middle of the canvas.)
Step 4
Pass the buckled end of the adjuster strap through opening in the fabric and around the long bow. Thread looped end through buckle. Attention should be paid to the orientation of the strap and buckle so that the finished piece resembles photo A. Pass the looped end of the strap over the end of the short bow and slide down into position directly across from opening in fabric where buckled end is attached. (See illustration.) Leave at maximum length. Repeat this step for the second strap then assemble the straps for the front bow. See enlargement.
Step 5
Pass looped end of each hold down strap over each end of the long and medium bows. Use a no. 8, 1/2” screw to fasten strap to bow frame at each pre-drilled hole position as shown. Position strap over hole and insert screw, with finish washer, through center of strap and into pre-drilled hole.
Step 6
Connect short frame ends to jaw slides on each side of long bow frame. Frame ends can be rotated to align with jaw slides. Repeat for medium frame ends as shown. Jaw slides should allow bows to pivot, but also be tight enough to hold securely.
{ "@context": "http://schema.org", "@type": "HowTo", "image": { "@type": "ImageObject", "url": "https://www.savvyboater.com/content/images/blog/Step-1.JPG" }, "name": "How to Install a Bimini Top", "description": "Bimini top installation does not need to be difficult if you follow these easy step by step instructions. The only tools you need are a drill with a 9/64” drill bit, a Phillips head and a flat head screwdriver", "totalTime": "PT2M", "video": { "@type": "VideoObject", "name": "How to Install a Bimini Top", "description": "How to install a bimini top", "thumbnailUrl": "https://www.savvyboater.com/content/images/blog/Step-1.JPG", "contentUrl": "", "embedUrl": "", "uploadDate": "", "duration": "P1MT10S" }, "supply": [ { "@type": "HowToSupply", "name": "A bimini top canvas" }, { "@type": "HowToSupply", "name": "1/2 inch screws" }, { "@type": "HowToSupply", "name": "bows" }, { "@type": "HowToSupply", "name": "adjuster straps" } ], "tool": [ { "@type": "HowToTool", "name": "A drill" }, { "@type": "HowToTool", "name": "A Phillips head" }, { "@type": "HowToTool", "name": "A flat head screwdriver" } ], "step":[ { "@type": "HowToStep", "name": "Step 1", "text": "Identify the hook shaped, long, medium, and short metal side bow sections. Using the long side bow sections, and one of the center cross bow sections, assemble the side bow and center bow parts as shown, aligning the pre-drilled holes. Use the 1/2”, no. 8 screws to connect the bow parts securely.", "image": "https://savvyboater.com/content/images/blog/Step-1.JPG", "url": "https://www.savvyboater.com/content/images/blog/Step-1.JPG" }, { "@type": "HowToStep", "name": "Step 2", "text": "Spread the Bimini Top canvas out on a flat, clean area with the bottom side up. Sewn-in label indicates the bottom, or inside, and the back of the top.", "image": "https://savvyboater.com/content/images/blog/Step-2.JPG", "url": " https://savvyboater.com/content/images/blog/Step-2.JPG" }, { "@type": "HowToStep", "name": "Step 3", "text": "With the bows assembled, insert the medium bow assembly through the sleeve at the front of top. (This is the sleeve opposite the end with the sewn-in tag.) Note the position of the single pre-drilled holes on the bow frame. (Holes should be facing toward the middle of the canvas.) Insert the short bow assemblies through the small sleeves in the center of the top and the long bow assembly through the sleeve at the back of the top (nearest the sewn-in tag). Again, note the position of the single pre-drilled holes on the long bow frame. (Holes should be facing toward the middle of the canvas.", "image": "https://savvyboater.com/content/images/blog/step-3-4-5-6.JPG", "url": "https://savvyboater.com/content/images/blog/step-3-4-5-6.JPG" }, { "@type": "HowToStep", "name": "Step 4", "text": "Pass the buckled end of the adjuster strap through opening in the fabric and around the long bow. Thread looped end through buckle. Attention should be paid to the orientation of the strap and buckle so that the finished piece resembles photo A. Pass the looped end of the strap over the end of the short bow and slide down into position directly across from opening in fabric where buckled end is attached. (See illustration.) Leave at maximum length. Repeat this step for the second strap then assemble the straps for the front bow. See enlargement." }, { "@type": "HowToStep", "name": "Step 5", "text": " Pass looped end of each hold down strap over each end of the long and medium bows. Use a no. 8, 1/2” screw to fasten strap to bow frame at each pre-drilled hole position as shown. Position strap over hole and insert screw, with finish washer, through center of strap and into pre-drilled hole." }, { "@type": "HowToStep", "name": "Step 6", "text": " Connect short frame ends to jaw slides on each side of long bow frame. Frame ends can be rotated to align with jaw slides. Repeat for medium frame ends as shown. Jaw slides should allow bows to pivot, but also be tight enough to hold securely." } ] }
